Almost two weeks ago I posted an article on my most recently bought Espresso machine, the Saeco Aroma with a couple of hidden defects. Once things were sorted out with the seller and the necessary parts were ordered I could finally get to work.
Déjà vu
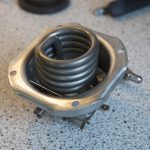
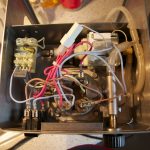
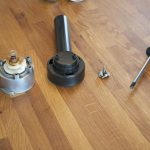
Like I wrote in the article mentioned above, the innards of the Saeco Aroma look a lot like the Isomac Giada I repaired earlier. In fact, the only real differences are to be found in the material used for the boiler and a few minor differences like the number of temperature sensors, switches and the mounting of the steamvalve / pressurerelief on the boiler. It also uses a single hose water system, which basically means that the hose used to pull water in is also used to relieve excess waterpressure from the boiler.
Cleaning
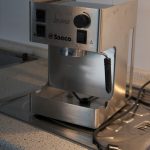
Once I took the machine apart and ordered all the necessary parts, all I could do in the time in between was cleaning the frame and parts. The stainless steel frame is spotless, not a speck of rust (no surprise there) and in terms of scratches it’s quite pristine as well.
-

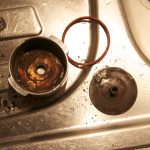
- Saeco Aroma without tank and driptray – before cleaning
While I had the boiler apart I put it into a citric acid bath and let it soak for a few hours. Normally about half an hour is long enough but since the upper part of the boiler has a fixed baffle in it I let it soak a little longer so that all possibly hidden calcium deposits (or scale buildup) would be gone as well. The steamvalve and paranello were cleaned the old fashioned way, with dishwashing soap and a sponge. The sad part? I had ran out of things to clean…
Out with the old, in with the new
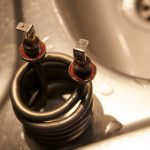
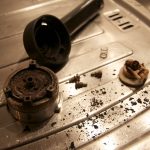
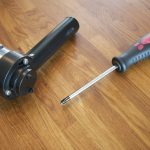
With all the parts cleaned it was just a matter of waiting for the replacement parts to arrive and once those landed on my doorstep it was time to get cracking. The obvious parts to be replaced are all the rubber o-rings and the heating element. I also like to install a new powercord on all the machines that I get my hands on.
-
- Old parts on the right, new parts on the left

-
- New Saeco Aroma heating element
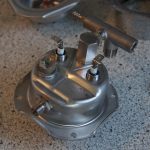
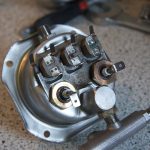
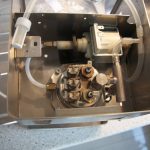
First I put the top half of the boiler back together. When I pulled the top half apart earlier I noticed the three temperature sensors where sticking to the stainless steel boiler, later it occurred to me that it wasn’t grease or glue rather than thermal paste to create an optimal thermal connection between the boiler and the sensors. When applying thermal paste it is important to not go crazy with it, just a small drop will do. With all three sensors in place I reinstalled the sensor retainingclip and tightened the assembly with the two nuts on the heatingelement. To prevent damaging the heatingelement by using too much force while installing the element, place top half of the boiler with the element in the palm of your hand. The nuts should be tight but the element should not twist!
-
- A tiny drop of thermal paste will do
-
- The thermal paste also functions as an adhesive of sorts
-
- New heating element
-
- All sensors held in place by its retainingclip
At first I wasn’t quite sure if I wanted to replace the grouphead seal because it wasn’t in a bad condition at all, but when I eventually made the order I included the grouphead seal as well since practically every other seal and gasket would be replaced as well and it made sense to completely freshen up the machine.
-
- The new grouphead seal, without the shower screen
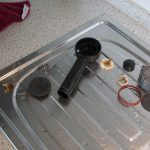
The hoses were probably the first thing that yelled “Replace me!” when I initially looked at the machine. There was scale buildup inside them and I just didn’t want to even think about drinking the espresso’s that were made with water that was drawn through those hoses. Replacing them was quite easy, I used the old ones as a guide to cutting the new ones. I did a quick mockup with the boiler unit (partially) in place and attached the hoses to make sure none of them would be too short or too long.
-
- Quick mockup of (partial) boiler / grouphead unit and waterhoses
Whenever you start taking things apart, whatever it may be, it’s best to make as many notes as to how they once fit together as you can. It doesn’t matter how you make those notes, write them down or like me, take lots and lots of pictures. The mechanical parts of these machines are quite simple to put back together, the electrical part however is quite a different story. I always refer back to my notes and pictures to verify that I reconnected everything as it was connected before I started working on the machine. In this case however I forgot to specifically take written notes of the order of the temperature sensors, my other photos however showed me exactly which one went where and which wires were attached to them.
-
- Looks familiar…
Pressurized portafilters
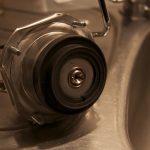
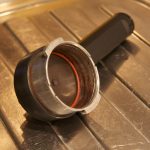
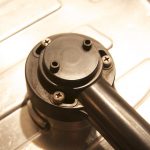
The standard portafilter for this machine is different from regular portafilters, it actually is a key component in making the espresso. Normally the portafilter is just a handle that keeps the basket with the coffee grounds in place. The coffee grounds are packed tightly into the basket so that the machine has to force the water through the dense puck of coffee. This machine however has a pressurized portafilter which means that you don’t have to actually tamp (actually you shouldn’t tamp at all) the coffee grounds and the grounds don’t need to be as consistent as with conventional machines.
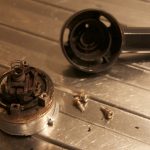
Aside from the pro’s and con’s of pressurized vs. conventional portafilters it also means that there are actual parts inside the portafilter, which explains why it is quite a bit taller than most normal portafilters. These parts always end up coming in contact with the coffee you’re making and that was quite obvious when i disassembled the portafilter. Luckily a lengthy soak in a Pully Caff bath did wonders. After that all the parts were cleaned with regular dishwashing soap and then reassembled.
-
- Old, stale grounds and lot’s of coffeegrease
-
- Removing the three screws on the bottom
-
- YIKES!
-
- Not looking too much better here either…
-
- … when was this cleaned last?!
-
- Pully Caff really does work wonders…
-
- Post Pully Caff and dishwashing soap
-
- Putting it back together
-
- Portafilter assembled
Worksheet
- Fully cleaned
- Completely descaled
- New heating element
- New waterreservoir
- New grouphead seal
- New steamvalve seals
- New paranello seal
- New boiler / grouphead bolts
- New watersupply hoses
For sale
This machine has been fun to get to know and it certainly threw me off for a bit when i first got my hands on the portafilter. However, to keep new projects coming in i will have to sell this one as well. It’s a great little machine, doesn’t take up too much space unlike many other machines. The pressurized portafilter is very forgiving in terms of grounds so you could even buy pre-ground coffee from the supermarket and still have good results. It definitely is a great entry level machine and with the new parts and the amount of time i spent on it it has a whole new lease on life.
-
- Saeco Aroma Espresso machine, pressurized portafilter, basic basket and basket with podadapter

-
- Brand new waterreservoir with new watersupply hoses and cleaned filter

-
- Cleaned grouphead, new grouphead seal

-
- Cleaned paranello milkfrother with fresh o-ring on rotating steamwand

where you get your parts?
part good pricing?
Thanks
I get most of my parts from espressoxxl.de.
Weiss wer wo ich den Siebträger von Saeco Aroma Sin 015X bekomme ich suche und suche aber irgendwie finde ich den nichtmehr
I believe it’s this one: https://www.espressoxxl.de/DRUCKSIEBTRAEGER-KOMPLETT-SAECO_1
Hey, da ich mich auf Kaffee-Netz zwar gerade angemeldet habe, aber (noch) nicht posten darf, hier meine Frage: Ich arbeite für eine NGO der zwar das Wohl Ihrer Mitarbeiter am Herzen liegt, die aber Filterkaffee für absolut ausreichend hält, um den Kaffeedurst dieser Mitarbeiter zu stillen;)
Da ich mir privat ursprünglich aus Kostengründen die Aroma holen wollte, mir dann aber wegen der “Aluproblematik” nach langem Hin und Her die Silvia gegönnt habe, überlege ich jetzt die kaffeesüchtigen KollegInnen zusammenlegen zu lassen und deine Maschine zu kaufen.
Wir haben momentan 5 Kaffeetrinker und kommen so auf 5 bis 10 Tassen täglich – meinst die kleine Aroma könnte das aushalten…?
Ich möchte da jetzt keine Garantie von dir, letztendlich ist bei uns einfach preislich nichts anderes drinnen;)
Hallo Peter,Den Saeco musste 5 bis 10 Tassen täglich ganz schon hinkriegen. KeinenAhnung was ich weiter noch dazu sagen muss haha. Garantie kann ichleider auch keinen geben aber ich erwarte keine Probleme mit de Saeco.Falls irgendwie etwas schief läuft bin ich immer per Mail (oderWebsite) erreichbar.
Hey, habe dir via Kontaktformular geschrieben 😉
And here’s the Aroma in its new surrounding:

We just moved into our new office and there`s still so much to do, at least now we can make some decent espresso to keep us going – thanks Sebastiaan!
Don´t know if the “refurbishing business” is sth you do on a regular basis, but buying from you really was a pleasant experience and I would like to recommend you to my friends!
Thanks again and take care!
Apologies for posting to an old entry, but: How the heck did you get the portafilter back together? I cannot get the plastic inner mechanism to stay in place due to the large circular wire spring. So when I try to wed the upper with the lower pieces, things will not align correctly.
Hi DB, no worries about replying to a dated post, i’m here to help 😉 Anyways, There are supposed to be two springs in there but neither should really cause any problems. The best way to do it is to put the aluminum part on the table with the bottom up. Then put the assembled white valve on top of that and put he handle on top of that. The more or less V shaped spring should stay in place and normally is of no concern since it doesn’t interfere with the black bottom. The spring in the middle will slightly press up against the bottom of that same handle but you can just press through that.
It’s best to make a picture and post it on here or mail me a link to it so i can see what you’re having problems with exactly.
Hope this helps!
Got it fixed. Thank you for your reply.
Glad it all worked out =)
Hallo Sebastiaan,
Thanks always for the wonderfully detailed write ups you have restoring these amazing pieces. I’d recently received a La Pavoni Espresso Plus (not sure the build year, but late 90s I would imagine). It has a similar pressurised portafilter, but I was wondering if it would take to a normal 53 mm portafilter instead. If so, could you advise a suitable one? Would espressoxxl.de carry something like that? Thank you for your time.
Hi MW,
the Saeco Aroma uses a pressurized portafilter that you can easily de-pressurize by taking out the white plastic valve and the so-called crema disc. It’s completely reversible so it won’t harm the resell value. You could however opt for a second portafilter. After a bit of research i found that apparently certain Isomac portafilters should work, however EspressoXXL.de doesn’t seem to carry them. I did find one at Caffé Milano. If you’re looking for a rather fancy version though, Seattle Coffee Gear has this one:

Link
If you have some measurements of your current portafilter i can compare them to the Giada portafilter i have on hand at the moment.
Let me know what ends up working out for you!
Hi Sebastiaan,
Had the opportunity to take some measurements of the LP 53 mm portafilter for comparison with the Isomac Giada’s, they are:
Internal Diameter (filter basket removed): 55 mm
Outer Diameter (without locking lugs): 60 mm
Outer Diameter (edge to edge of locking lug to locking lug): 67.5 mm
Circumference of Locking Lug: 19 mm
Locking Lug (thicker section): 5 mm
Locking Lug (thinner section): 4 mm
Height of metal portion (before the plastic handle ring): 20 mm
Let’s hope they match up!
Hey, sorry about the late reply. The measurements on the Isomac Giada portafilter are:
Inside diameter: 55.4mm
Outside diameter: 60mm
Inside depth: 25.4mm
Outside diameter over notches: 66.8mm
Notch width: 16.8mm
Notch height (highest point): 5.75mm
Portafilter portion above handle: 26.4mm
Filter measurements:
Inside diameter: 54mm
Outside diameter: 54.8mm
Outside diameter with flange: 60mm
Height: 24.9mm
Seems like a very close match although the handle will be a bit lower but that shouldn’t be a problem i think.
Hey Sebastiaan, I loved the pictures of your Aroma reboot! I made the mistake of pulling the red rubber gasket out of my portafilter and now I can’t get it back in. What did you use to get it seated properly? Thanks in advance!
Hi Kay,
Is this the red rubber gasket you are referring to?https://sebastiaanswinkels.files.wordpress.com/2013/04/saeco-aroma-depressurizer-portafilter-4.jpg?w=675
That gasket has a little slot in it if i remember correctly in which the disc is seated. After that the disc and gasket are simply pressed into the portfilter and that’s it. Hope that helps, if not send me or post a picture of the gasket to show exactly what is going on =)
Yes, that’s very helpful! I didn’t know the disc comes out of the portafilter. Mine seems welded in place–most likely by years of coffee residue! I’ll try to pop the disc out (I’ll have to hook under it somehow), then slide the rubber gasket back around it and press it back in place. Many thanks and best wishes for you on your next project!
If i remember correctly the disc itself has a little “tube” on the bottom that is pushed into the center hole in the portafilter itself (see previous picture). If you have the handle and valve off you should be able to push the disc off/out from the bottom of the portafilter easily.
Hi Sebastiaan,
I’m reassembling the boiler and the nuts seem to be just slightly too large that they press up against the raised ring on the bottom half of the boiler assembly. As a result, when they are tightened, they splay outward and do not drop down directly into the four holes punched into the bottom of the frame. I think I’m using the correct order of assembly, but is there a trick to reassembling the boiler?
Hi Mark, there can be a few issues here. Did you perhaps forget the portafilter mount? The correct order is:
In very rare cases it might happen that the holes in the individual parts are slightly offset during the fabrication in which case you will have to rotate the parts around one another to find which orientations match best.
Hi Sebastiaan,
I’m attempting to rebuild my own Saeco Aroma, but I can’t seem to join the two halves of the boiler properly. I ordered a new OR176 silicone o-ring, which I believe is the correct gasket. When I carefully tighten the 4 bolts (a little at a time), the o-ring starts to buckle inward and partially ends up inside the boiler cavity, instead of sitting nicely in its groove. This leaves a large gap and prevents a proper seal.
Is there some trick you used (e.g., some kind of adhesive or RTV product) to secure that o-ring in place? Did the o-ring you used have a completely circular cross-section, or was it slightly flattened to better fit the groove?
Hi David,
RTV is not suitable for use in machines that you make any kind of food with as far as I’m aware, adhesive is not an option either. Reading your topic on CoffeeGeek you mention using food-safe silicon grease on the o-ring which is asking for trouble. The ring should be clean, free of any grease and debris and the mounted on clean surfaces. Then, evenly tighten the bolts a little bit at a time.
However, looking at your very last picture it seems like the mating surfaces of the boiler halves are somewhat warped. Can you put both of them on a flat surface and make a picture? Both surfaces should be flush against each other and therefore completely flat (except for the o-ring groove). You could try rotating the halves over each other without the o-ring in place to see if there is a particular orientation in which they fit together perfectly.
Completely forgot about using the correct o-ring. Basically there are two boiler types for the Aroma’s, one is brass the other is stainless steel like yours. The both use different rings though. The brass boiler uses partnumber 140321262 (OR177) and the stainless steel version uses a different ring with partnumber 140322962 (OR176).
Hi Sebastiaan,
I followed your suggestion and removed all the silicone grease and re-wiped the surfaces clean. I also rotated the halves and found one orientation with slightly smaller gaps than the others. I don’t want to speak too soon, but I think it works now! I just pulled 10 shots without a leak. During an earlier fix attempt, I pulled 10 shots but then suffered a major leak from that seal while the machine was cooling down (with a different o-ring, probably the incorrect OR177 part you mentioned). So far so good this time…
Thank you so much for your help!!
-David
Glad you got it sorted =) I appreciate the shout out on Coffee Geek as well =)
Hi Sebastiaan,
I just put apart and cleaned up the portafilter of my Saeco aroma for the first time, and while it was a bit tricky to put it back together, I thought I figured out the way because it just seems to work like before and seem aligned otherwise. However, the first shot of espresso after the cleaning just didn’t create the crema that it used to. I also de-scaled the machine for the first time.
The order in which I assembled the portafilter is: the aluminum part, then the large circular wire spring, then the assembled white valve, then the spring on top of the valve, then the black handle. I did not tighten the screws too hard, just to the touch.
Any thoughts why the machine does not make crema anymore? Any tips/tricks on what to look for with regards to the portafiler assembly?
Thanks,
Hi Oscar,
it seems you’ve put the bottom half of portafilter back together just the way it’s supposed to. I trust you put the black disc and o-ring back inside the basketside of the portafilter as well?
It is quite normal that the first 2 or 3 shots after cleaning develop a little less crema on just about any machine, it can be caused by residual citric acid from the descaling process. I use PuliCaff to remove coffeegrease and coffeeoils on several parts and that always has a temporary influence on the crema as well. That’s why the first shot is usually discarded, sometimes the second and third as well.
How old are the beans you’re using? Did you buy them pre-ground or do you grind them right before you need them?
Hi Sebastian and Oscar,
I was reading your messages and I thought you could give help me with the following. Few days ago, the brewing light on my 8 years of usage Aroma Seaco coffee machine was not turning on anymore. I could still make coffee but I noticed that the water took longer than usual to warm up.
Yesterday, I had left the portafilter filled with coffee attached to the coffee machine by mistake and I turned it on. When I realized that it was attached to the machine, I tried to detach the portafilter from it. Just as I was starting to untwisting it, it exploded and the portafilter dropped on the metal base while the force of the steam bent it. Wow, I cleaned everything and unbend the metal base. I left it there until this morning.
This morning, I put coffee in the portafilter and I was unable to screw it in the machine as usual. Could you tell me what is the problem and how do I get this fixed.
I live in Vancouver, BC. Thank you for your help. Lauraine
Hi Lauraine,
sounds like an eventful day! When a boiler takes longer to warm up its usually because of one of three things: A) the boiler needs to be descaled as the scale on the heatingelement actually insulates the element from the water, B) the heatingelement has its best days behind it or C) the temperature sensor on top of the boiler isn’t functioning well, probably bad contact with the boiler. Scale or a worn out element in itself don’t cause a lot of problems, it just takes longer to heat and it’s inefficient in terms of electricity. A bad temperature sensor is more troublesome and is easily detectable. If you’re not actually brewing but just heating to brew temperature (not steam temperature) then the boilerpressure shouldn’t really go above 1.3 bar. The boiler won’t explode since they see much higher pressures during brewing and there’s a overpressure valve on it, but it’s surely something to clear up. It has however very likely nothing to do with what happened next.
In regards to the little explosion you’ve had, I’m going to say the puck (old coffee grounds) in your portafilter hardened overnight and prevents any water or pressure from passing through. When you turn on the machine and it warms up there’s going to be a little pressure built up. Normally when there’s no portafilter locked in (or an empty portafilter locked it) that results in a few drops of water. Now, your hardened puck prevents that pressure from being released and when you remove the portafilter that pressure creates enough thrust to bang the portafilter into the driptray. The reason why the portafilter might not be able to get locked into the grouphead anymore might be due to damaged tabs on the portafilter itself or bent / broken “threads” on the grouphead. If you want you can post a few photo’s of the portafilters’ tabs and the bottom of the grouphead, then I’ll be able to see if that actually might be the problem.
Hi Sebastiaan,
I have a problem with my Saeco Aroma: the machine causes a short circuit after a while. When the temperature has reached its point to press the button for making coffee, the short circuit occurs.
I removed almost every part of the machine and cleaned the heat element. After putting all parts together the machine started leaking water. I used too much force in turning tight the side Connector to the Boiler. It just broke off(!), so the only thing I can do is order a new boiler top and a new connector.
But before I do so, I’d like to know what could cause the short circuit.
Hope you can answer my question. Thanks on behalve,
Jan
Hi Jan,
shorts could be caused by a number of things. Are you sure you reconnected the wiring correctly? The heating element is disabled by one of the two/three sensors on top of the boiler, if one of those shorts to ground it will trip the fuse. Another common mistake is over tightening or twisting the heating element which will tear the heating element and then short with water, but since you’re able to heat up fine I’d check the wiring first.
Hi Sebastien,
Here are some pictures and thank you in advance for your reply.
Lauraine
Hi Lauraine,
your pictures didn’t come through, please send them to my e-mail address: sebastiaan.swinkels@wholelattecoffee.com
Hi Sebastiaan:
I saw on another site that the Saeco Aroma has a reset button. My machine stopped working after 6 weeks. I think I accidentially left it on. Phillips is requiring me to send the machine out for repairs which I suspect will take several weeks. I looked inside and did not see anything that looked like something I could push. Would appreciate any info you could give me. Thanks!
Hi Coralee,
the Saeco Aroma doesn’t have a reset button to push. However the newer models have 3 heatsensors on top of the boiler, one of which is a auto-resetting fuse. That fuse can only be tripped by excessive heat and auto-resets once the boiler cools down. However, there are models out there without that auto-resetting fuse / sensor. Those fuses have to be replaced once they are tripped. If the machine doesn’t turn on anymore I’m pretty sure that you’ll have the latter type of fuse. It’s not terribly hard to replace those yourself, more than likely Philips will charge you for the repair anyways since it’s not a manufacturing defect.
Hi Sebastiaan, great post, I hope you’re fine. My saeco Aroma stop working, I just replaced the Saeco 152 Degrees Celsius Thermal Fuse (2526) with a new one, now I can hear that it starts to warn up but the brewing light is not turning on. Additionally, after some minutes it begins to leave more steam than usual from the porta filter. Any idea please? is it possible that the thermal fuse is not well placed? Thanks!!!
Hi Manuel,
sounds like the sensor might not be sensing the correct temperature. When you replaced the sensor, did you use a thermal paste? The thermal paste ensures a proper thermal “connection” between the boiler and the sensor, which is absolutely essential for the sensor to work correctly. Thermal paste can be found at a local computer parts center if you’re in a pinch, otherwise contact the company that you bought the sensor from.
Hi Sebastiaan, thanks for your answer, The thermal fuse is this one: http://www.espressotec.com/index.php/parts/inline-152-degree-thermal-fuse.html , as you can see it is inside an insolating cover. When I removed the faulty one, I didn’t see any trace of thermal paste. Even with the insolating cover, do you think that the thermal fuse will work? Thanks,
Ah, different fuse. There are actually two types of fuses, one looks like the one you have right there. The other looks exactly like the two round sensors on top of the boiler. The fuse you have should be mounted on top of the boiler but has nothing to do with the actual steam or brewing temperature. If those end up to high (measure, don’t guess!) that could be due to a faulty sensor or caked up thermal paste.
Hi! I have a weird leaking problem and was wondering if you knew what was going on:
https://www.dropbox.com/s/bzmju1ga4qw6hs9/IMG_1598.MOV?dl=0
Thanks!!
Hi Nick,
It looks like the lower part of the boiler failed. The water is actually supposed to come out of the hole in the middle of the brass part. Water leaking on the outside of the polished portafilter mount usually means a leaking boiler seal but in your case it seems to be coming from inside of the mount but on the outside of the boiler. That pretty much means the lower part of the boiler leaks pretty significantly. To be sure you’d have to open up the machine (make pictures of *everything* and make notes of what goes where!!) and look at the boiler itself.
Hi Sebastian,
We have had a Saecco Aroma that has been awesome for about 6 years, and then stopped working recently.
The pressure appeared to no longer be adequate to get the water through the coffee- we order a gasket tune-up kit, and since that had never been done, proceeded with that as a first step. The shower plate above the porta filter wouldn’t come out, and we had to remove the whole boiler head apparatus to drill the screw out… then a similar intervention to get the grouphead seal out, which was frozen in place. Finally, everything apart, I replaced the spring and silicone (?) ball, then reassembled and with new gasket and screen in place, tried it out. Bad leaking around portafilter head. The portfilter fit seemed sloppy, and on inspection, I realized the back ramps on the inside of the aluminum collar where the portafilter sits were badly worn down. I ordered a new collar, installed, still leaking, though the portafilter stops at the right place now. I’ve been wondering whether the old portafilter could be part of the issue, as one of the few remaining gasketed parts that hasn’t been replaced, and today, part of the plastic interior mechanism broke off when we were reassembling- checking to see if all parts were inside. Ordered a new one… Any thoughts about what might be causing the leaking? Any other things I should check that I haven’t mentioned?
One other troubling detail- when I have reassembled the boiler, it is difficult to get the connection to the steam knob to move easily. I am wondering if there is some kind of spacing inside that I have not replaced. The first couple of times I put it back together, I had trouble getting the nuts on the outside of the aluminum collar to go on- the bolts were not sticking down far enough through the boiler unit. Fiddling and rotating eventually made things go together, but the lack of easy operation of the steam know makes me think that I may not have it quite right.
Any advice? Thank you very much! We love this machine, and cannot afford another right now, so would really like to get it going again…
Hi Heidi,
the collar is aluminum but the portafilter (in most cases) is brass and should be less prone to wear. Check if the surface of the portafilter underneath the filter basket and the filter basket itself aren’t damaged. There’s a chance it might leak past there. Also check if the grouphead seal you installed has the right thickness. There might also be some sort of debris on the other side of the grouphead seal (between the boiler and the seal), but considering the trouble you’ve gone through already I doubt you missed that 😉
That said, are you absolutely positive that you reassembled the boiler itself correctly? I’ve found that most boilers have only one orientation of the top and bottom halves that is actually watertight, which is why I always make a few witness marks before disassembly. The boiler seal should also be replaced if you’ve ever even loosened the bolts of the boiler.
You can easily tell if it’s the boiler that’s leaking or the grouphead seal by looking at where the water is leaking from. If it comes from within the collar it’s the grouphead seal, otherwise it’s very likely the boiler itself.
As for the steam valve and short bolts that prevent you from easily threading the nuts on, that all sounds like an alignment issues. Granted the bolts aren’t any longer than they absolutely have to be but misalignment can easily throw you off.
If you can, make a couple of pictures of the leakage and how you put the boiler together and send them my way.
Hi Sebastian,
thank you for your reply! Very helpful! I got the new portafilter, and although it is maybe a little better, it is still a sloppy fit into the collar, and that is where the leaking is coming from. The only thing that makes sense to me is that the grouphead seal that was sent to replace the old one is not thick enough- I can’t figure out how else there would be slop there. How would I get a thicker one that still works with the machine? Flummoxed.
First, contact the shop that sold you the seal you have now, ask them for a thicker version. If they don’t have one see if they can source it for you. If not, I can look into getting you the proper seal from my supplier.
Hi Sebastian,
So, the work continues on this machine, after having a couple of mechanically inclined folks look at it, the thought is that it has to be the group head gasket. We ordered another one, this time from Espresso Parts, Lacey Washington. Fits in perfectly, is sloppy with portafilter. My spouse just took the machine apart again, to make sure the boiler was situated as low down as it can be, still as loose a fit as it was before. I emailed Seattle Coffee gear, where I originally bought the machine, and the grouphead maintenance kit- and they say this is the gasket for this machine, they have no other larger ones. I have a couple of pictures of the assembly, and a video of the portafilter not fitting right- if you are willing to give a look, how could I send them to you?
thank you for your help!
Heidi
Hi Heidi,
Sad to hear the issue still hasn’t been resolved. Send any pictures you have to my email: sebastiaan@wholelattecoffee.com. Video is a little harder, depending on size that may or may not fit in an email. If it’s any larger than 25mb (which it probably is) put the video on youtube as an unlisted video and send me the link via email.
Just got your photo in the mail and the issue you’re having can be solved quite quickly. Let me post the photo you sent me for future reference:
The problem you’re having is that you’ve assembled the boiler and collar wrong. The collar goes on the “inside” of the machine. You’ll have to take the collar off, take the boiler out of the machine and put the collar on the boiler first before putting the whole assembly into the chassis.
This is what it is supposed to look like before you put the boiler plus collar into the chassis:

Then, put the boiler assembly into the machine and put the nuts on to make it look like this:

Shouldn’t take too long to fix 😉
Sebastiaan,
The shower screen on my Saeco Aroma popped out with the screw still in (metal around the screw worn off, I guess). I am unable to get the screw out to put on a new screen. Do you have any advice on how to get that screw loose enough to get it out without stripping it? Thanks. Mick
Another reply to an old thread– this is my machine and it won’t pull in water, but I think the pump is still working. Suspect my mom never decalcified it! What do I do? Where are you located ( I am in Philadelphia, USA) and is this a machine you could work on?
I’m located in Europe, shipping the machine back and forth would be rather pricey in shipping alone. That said, it’s a job you can do yourself. If the machine still wicks up some water, you can put a citric acid solution in the tank and then slowly but surely descale it that way. If it doesn’t wick up anything, check to make sure the tubing is not obstructed (if not, either clean or replace them). If it still doesn’t draw the solution into the tank with clean tubing, then you’ll have to open up the boiler and do it manually. Unplug the machine and make lots of pictures of how everything is connected before you pull anything apart =) /Sebastiaan
This thread won’t die bc the Aromas were (are) awesome little machines! Just wanted to say thanks for this write up. I’m going to try and redo mine, which my parents have had for 15 years, using your overview. Really helpful.
Good luck!