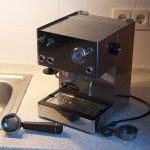
A little over 2 weeks ago i got my hands on another little project. I’ve been interested in the inner workings of espressomachines for a while now and i was looking for an easy machine to start tinkering with, preferably with as little electronics as possible. I found one on eBay that fit the bill and needed some work.
Intro
The seller on eBay mentioned a broken heatingelement as the problem and that he/she couldn’t find a replacement because the manufacturer didn’t have spares anymore. When buying machines that need parts replaced it’s always best to check if you actually have a source for those parts before committing to a job you have no way of finishing. I knew there were still parts being sold for this machine, even heatingelements.
Disassembly
The machine was decently packaged and shipped but it wasn’t all that clean. Not so bad but i still had to see what was actually wrong with it. When i first plugged it in and switched the machine on my entire kitchen was suddenly blacked out. Alrighty, electrical problem it is. I opened up the machine and started unplugging things to narrow down the problem, which eventually ended up being the heatingelement like the seller mentioned.
-

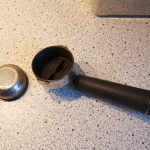
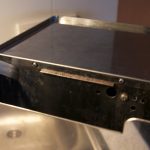
- Dirty machine, basket firmly stuck in the portafilter
-
- Dirty grouphead
-
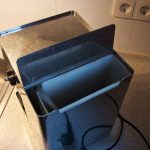
- Almost yellow tank
-
- Wow this thing is BLACK!
-
- 2 Screws to get to its guts
-
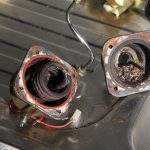
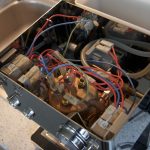
- Guts! Always take overview pictures of the wiring before yanking stuff out
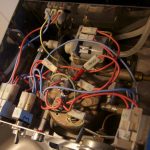
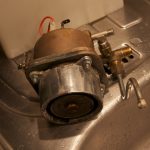
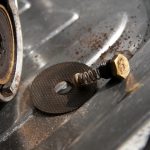
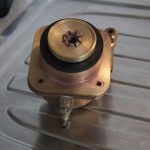
To get to the heatingelement i had to get rid of all the wiring, switches, lights, the pump plus tubes and remove the steamvalve. Once that was all out you’re left with pretty much an empty chassis and a grouphead / boilerunit. Once that unit was removed from the chassis i removed the top half of the boiler and found quite a lot of calcium deposits just moving about. Considering the fact that it was probably used with unfiltered water it wasn’t a big surprise.
-
- Grouphead / boilerunit removed
-
- Flipped over

-
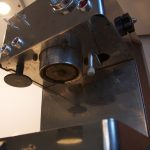
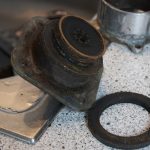
- Removed the showerscreen and pressurevalve
-
- Could’ve used a descaling or two…
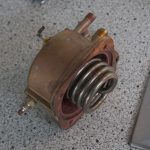
Testing the heatingelement
Once the top half of the boiler was out i could easily get to the heating element. I removed the heatingelement and used a multimeter to test give it a quick test to see why it insisted on blacking out the kitchen. It turned out it didn’t just conduct electricity from one connector to another (which is normal) but also from either connector to the housing, which shorts out the circuit and causes a dark kitchen.
Cleaning
Obviously the machine needed a thorough cleaning and some parts had to be replaced. I placed an order for all the parts i needed and started cleaning. I put the brass and other unchromed parts in a citric acid solution (see “Descaling a La Pavoni Professional” for more info) and put the portafilter, steamwand and several other parts (including some of the Astoria grinder i’m restoring) in Pully Caff, a coffee grease remover that doesn’t affect chrome. The chassis was thoroughly cleaned as well and the outer part of the grouphead was polished as well.
-
- Black brass anyone? Looks like the portafilter seal is past due too
-
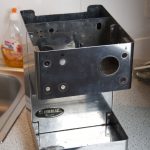
- Dirty chassis
-
- Clean chassis

-
- Very clean chassis

Once the new grouphead seal and heatingelement came in the grouphead / boiler unit was reassembled. The o-rings in for the steamvalve were both replaced for new ones as well and the whole unit was then mounted back into the chassis. The pump was reinstalled and the hoses were re-attached.
-
- Old and old parts

-
- New heatingelement installed
-
- New portafilter seal
-
- Oooh shiny…
-
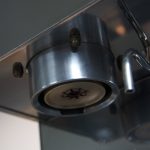
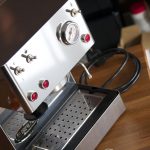
- Buffed the grouphead cover as well
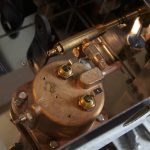
Once all the mechanical parts were back in the chassis it was time to test if my documentation of the wiring had been sufficient. It’s healthy habit to take as many notes and pictures as you can as finding electrical schematics for your particular project might be quite hard and they might even differ from revision to revision. In the end i took enough pictures and notes and putting the “extensive” amount of electronics and wires back into the chassis was a piece of cake. The original powercable however looked a little worn and tired too, so replacing it with a new one seemed like the reasonable thing to do.
-
- Wiring back in
-
- Everything connected as it should be
Conclusion
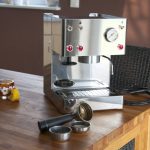
The Isomac Giada has now been restored to work as new and look as good. This machine was an easy intro for me as to how these machines actually work and i’m exited to find a new patient, whatever make and model that might be. This machine will be sold to someone who hopefully will take good care of it.

Pulling a shot
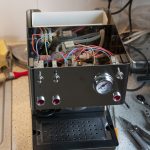
[Update] A buyer asked me for shotcharacteristics so i pulled a few shots to dial in my Mazzer and took some pictures. These pictures are from the last shot and show a very nice crema and nice rich color. The shot itself didn’t differ too much in taste compared to shots pulled on my La Pavoni Professional. I used 10 grams of Quijote Kaffee‘s “Oh Harvey” blend (my favorite by far). Obviously i haven’t fine tuned the grinder or figured out the optimal fill amount for the single (or double) basket, but that’d be next to impossible within 2 or 3 shots. I’m quite happy with the results however.
-
- Good crema right from the start

-
- and great crema all the way to the end

Worksheet
- New heatingelement
- New portafilter seal
- New steamvalve seals
- New powercable
- Full descaling
- Full cleaning
Hoi Sebastiaan,
Verkoop je het apparaat nog?
Groetjes,
Najib
Hallo Najib,
de Giada is al een tijd geleden verkocht, binnen een week na.
Hoi Sebastiaan,
Vraagje: is de ring in het groephoofd (bij de piston) ook te vervangen zonder de hele boiler uit elkaar te halen? Ik vermoed dat de oude er wel uit kan met een beetje wrikken, maar krijg ik de nieuwe er wel in?
Alvast Bedankt!
Groeten,
Ben
(translated into english for all to read)
Question: is it possible to replace the grouphead seal without taking the entire boiler apart? I think i can get the old one out with a bit of prying, but will i be able to get the new one in?
Die rubber in de grouphead is DIK en harder geworden over de jaren heen. Je kan die er heel misschien wel uitkrijgen met wat wrikken maar je bent waarschijnlijk daar dan langer mee bezig dan dat je de boiler losmaakt. Je hoeft de boiler zelf niet open te maken om die rubber eraf te krijgen, je kunt de aluminium manchet er apart af halen en dan is ‘t vervangen van die rubber vrij eenvoudig. Daar zit ook direct het volgende probleem van ‘t eruit proberen te wrikken van die oude (harde) ring, je loopt een groot risico die gegoten aluminium manchet te beschadigen / breken.
Mocht je er zelf liever niet aan beginnen dan is ‘t ook altijd mogelijk om ‘t apparaat aan te leveren en dan vervang ik die wel voor je tegen een kleine vergoeding 😉
English:
The rubber seal in the grouphead is quite big and probably hardened over time. It might be possible to just pry it out but i’m quite sure it’ll take you a lot longer than just disassembling the machine and replacing the seal properly. To replace that particular seal you don’t have to disassemble the boiler itself, the seal is located beneath the boiler inside the aluminum portafilter mount, which can be taken off separately. You also risk damaging / breaking the brittle cast aluminum portafilter mount by prying the old seal out.
If you’d rather not take on this task yourself you can always deliver the machine to me and i’ll replace that seal for you for a small fee 😉
Thanks Sebastiaan! (I’ll just answer in English).
I wasn’t able to take the aluminium portafilter mount of of the boiler head, it seems like it is stuck somehow.. Is there a way to make it come loose? I could email you a photo if that helps..
Thanks a lot!
You can post a link to your photo in a comment here, or send me an email: contact me
Every now and then coffeegrease will somewhat fuse the mount to the boiler but that should come loose with a slight tap. However if you tap it too hard you risk opening up the boiler itself (as that is held together by the same four bolts that keep the portafiltermount on the boiler). Should that happen you will have to replace the boilerseal. Then again, you do get to clean the inside of the boiler, you’ll be surprised what kind of scaledeposits you can find in those things.
Thanks for the comment! I tried giving it a slap, but it won’t come loose. Even when using a hammer (subtly) it stays attached. Do you maybe have a solution? Here is a link to a photo: https://www.dropbox.com/s/ijlioq07a9y9rvw/IMG_4008.JPG
That should’ve come off by now, but those black spots look like heavy coffee grease build up. Try soaking it overnight in a solution of water and dish soap. Or, if you have some, try some coffee grease cleaner like PullyCaff instead of the dish soap. Don’t drop it in citric acid though, the boiler part can handle it but you would have to re-polish the portafilter mount as that will turn cloudy within minutes.
Thanks Sebastiaan! I’ll try soaking it overnight, will keep you updated tomorrow.
Ok I tried soaking it in water and dish soap: no succes. Then tried another tip I got from a espresso machine repairman, soaking it in kruipolie (penetrating oil?) for 24 hours. Did that, still stuck… It’s very weird that this thing is stuck like this. Do you maybe have another solution left?
That thing should’ve been off by now. Weird. But after penetrating oil be sure to clean it thoroughly, I can’t see how anyone could suggest that kind of chemical in a food prep area…
Do you have any PullyCaff? An actual coffee grease remover would probably help but honestly I think I’d be brute forcing it by now, not that I ever had one stuck this hard…
Well, that’s interesting. The guy who suggested it is a professional mechanic in that field… After a few days of soaking in the oil it is still stuck. I don’t have any PullyCaf at the moment. Interesting thing is the guy who suggested the oil said not to use coffee grease remover as it would damage the aluminium… Kind of biased at the moment. Brute force is probably the only option left now, though I don’t want to damage the thing…
The thing is, penetrating oil *might* work, but it’s a strong chemical and far from food safe. PullyCaff does affect aluminum that’s why in combination with aluminum it’s kind of a last resort. If you don’t feel safe / comfortable “brute forcing” it yourself, box it up and send it to me. Contact me via my contact page.
Hello Sebastiaan, I have the same problem ( kitchen into darkness) So I was wondering where you get the new heating en rubbers. And how much they are.
By the way good work!
Gunnar
Thanks 🙂 the heating element (depending on model) costs either €29.15 or €29.16. You will also need the two heating element seals which cost €1.86 each (two needed). To get to the element you will have to open the boiler and therefor you also need to replace the boiler seal, €3.11. It’s not terribly hard or complicated but it does take a bit of time. I get my parts mostly from [url=http://www.espressoxxl.de]EspressoXXL.de[/url] in Germany.
Dank voor deze blog, vond hem ca 1 jaar geleden, terwijl ik op zoek was naar een 2e hands giada. Deze van marktplaats geplukt want door jouw heldere omschrijving niet ‘bang’ ermee aan de slag te gaan, mocht het een miskoop blijken.
Vandaag de lekkende piston rubber vervangen en dan gelijk ook de boilerring. Van binnen was de boiler eigenlijk schoon, op een hoop losliggend kalkachtig spul.
Groet,
Jeroen
Dank voor deze pagina, heeft er voor gezorgd dat ik de mijne heb ‘durven’ openen en zelf de ring etc. te vervangen.
Reinier
hi! great write-up and i need your help.. mu steam knob broke(!) and i need to replace the metal pin that holds it, pictured here: http://imgur.com/Cgo3HJ7
any tips how should it be removed?
regards
What holds the valve stem in is a metal clip. Grab the middle of it with some pliers and pull, it should come right off.
[Translated from Dutch]
Hi Sebastiaan! I’ve got the same issue as Ben above. The aluminum flange is completely stuck on the brass boiler. One night in dishwashing soap didn’t help, neither did 30 min in bio-descaler. How would you break it “apart”?
[original message]
Hoi Sebastiaan! Ik zit met hetzelfde probleem als Ben hierboven. De aluminium flens zit volstrekt vast aan de messing boiler. 1 Nacht in afwasmiddel heeft nog niet geholpen, 30min in bio-ontkalker ook nog niet. Hoe zou jij hem “openbreken” ?
Hi Sebastiaan! I’ve had this happen a few times on different machines. The issue is that the rubber seal has gone completely solid and has been coated in coffee oils and grounds. Quite simply put, it’s bonding the boiler and the portafilter mount together. Getting it separated requires brute force and elbow grease. Grab yourself a small flathead screwdriver and start chipping away at the rubber seal. It’s not easy, it takes some time, but at this point it’s the easiest way to get to two parts separated. Once you have managed to get the parts unstuck, remove the rest of the seal and make sure all mating surfaces are clean. Put in a new gasket and rebuild!
Hi there, i own the same machine since 2004, but i’m running into some problems… When i flip the power on the machine dosent heat up, the coffee switch is not activating the pump either… could it be the main switch?
Could be. To confirm that theory I’d unplug the machine and then remove the top cover. Then, with a multimeter in continuity mode, test the switch in both ON and OFF position. Your multimeter should be showing continuity in the ON position.
Hi, dank hiervoor. Maar wat was nou het probleem waardoor hij verkeerd stroom afgaf? Ik heb nu ook dat hij kortsluiting geeft, ontstaan tijdens een grondige reinigingsbeurt.. Hij begon steeds meer te borrelen, ook als ik de stoompijp activeerde, begon het in de broeikop te borrelen.. (ik liet de broeikop/douche, etc weken in een schaaltje met reiniger)…
Groet, Freek
Hi Freek,
a short circuit in these machines mostly happens when the element itself shorts out. The element should not be ran with a (near) empty boiler as that will cause it to overheat and fail. If you took the boiler apart and overtightened the nuts on the element itself there’s a good chance the element twisted which breaks the element more often than not. To test if the element is shorting out use a multimeter to test for continuity between either connector of the element and the boiler of the machine. There should be no continuity at all, but if there is any sort of connection that means the element is toast and needs to be replaced.
Hi Sebastiaan i am really sorry for this late reply.. embarrassing…
Thanks!
I will continue working on the giada now.
Cheers,
Freek
Hello,
What do you use to clean chrome parts with?
Do you soak the brass parts overnight in a citric acid solution?
How do you clean the heating element?
Mvg.
Anders
Chrome parts are best cleaned with regular dish washing fluid and elbow grease. The heating element can be dipped in citric acid as well, just make sure you keep the electrical contacts out of the solution as the plating on it will not survive contact with the acid. Also, don’t let it soak overnight, citric acid is too potent for that.
Hi Sebastian,
Is it correct that the center of the shower screen should bend inwards when the bolt is fully tightened so that the edge of the shower screen does not rest against the brew head.
Mvg.
Anders
Have you tried flipping the shower screen over?
Yes and as soon as I tighten the bolt nearly full it flips back.