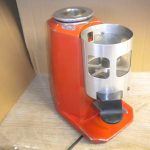
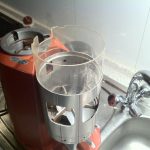
I’ve been looking for ways to get more consistant shots of espresso from my La Pavoni Professional and one of the few things that kept holding me back was the quality of the grounds. Knowing full well that my Nemox Lux was already producing the best grounds it could, I started looking for a new grinder. I found my grail in Italy, read on for the full story.
Sooo many choices
When I set out to get a better grinder I consulted a multitude of forums and discussion groups. One brand that kept popping up was Mazzer. Apparently they are built like tanks and with their flat burrs they are rumored to create a very fluffy kind of grounds.
Finding a candidate for a project
To keep costs down I browsed the for sale sections of local forums and browsed a lot of classifieds-sites. I was blown away by the prices that even 10 year old grinders were listed for. That’s when I knew it was going to be a project and that I’d settle for a used and abused one.
Finding one that fell within my budget however wasn’t an easy task and eventually I even ended up on eBay UK and eBay Italy. It was eBay Italy where I found my grinder. Lots of time left in the auction, zero bids and a price that was well within my budget.
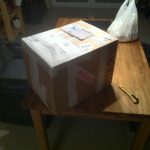
Oh do i love receiving boxes. The waiting for it i can do without though.
-

- Box Yay!
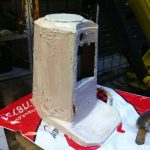
The Horror
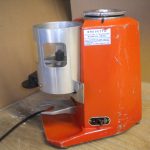
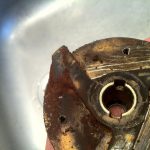
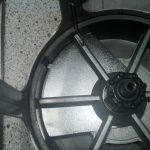
Well the “built like a tank” part sure was no lie, it’s heavy and it won’t be pushed over that easy. The paint however was in a dreadful condition, scratched, grooved, nicked, you name it. Some parts needed to be replaced and others were just missing. I’ve added the pictures that the seller posted on eBay since I (somehow) managed to forget to make those myself.
-
- Overall it looks okay…
-
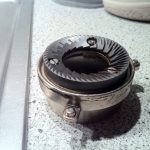
- but it’s missing a dosercover…
-
- the paint is horrible…
-
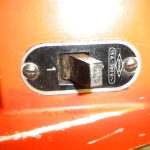
- the switch needs cleaning…
-
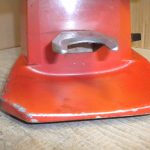
- the portafilterfork is crooked…
-
- the generic “tamper” needs to go…
-
- and i’m missing a beanhopper.
Cleaning and restoring
As with any piece of equipment i buy used, thoroughly cleaning is a number one priority. It was obvious from the pictures on eBay that the Mazzer needed a lot of love to revive it to its former glory but it also need a very, VERY thorough cleaning. There were old coffeegrounds everywhere, the grinder smelled awful and frankly if someone told me it had been sitting in a basement for 5 years i wouldn’t be surprised. I sure hope nobody actually tried to grind beans with it to be used for an espresso. The mere thought of it alone…
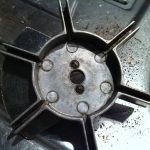
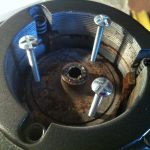
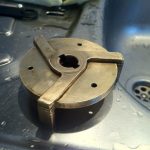
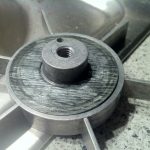
First i took off the grind setting ring that holds down the upper burrcarrier.
-
- Grindsetting ring already removed
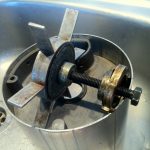
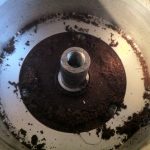
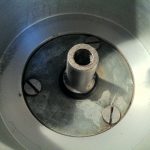
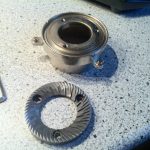
Then i took out the actual burrcarrier and found my first “treasure”. There was an abundance of old grounds that surely had something to do with the smell. As i cleaned it out i found there was actually a ridge or groove in the burrcarrier, too. I removed the burr from the carrier and found even more old grounds.
-
- The brown ring are old grounds
-
- Quite dirty eh?
-
- There’s a groove even?
-
- And more old grounds…

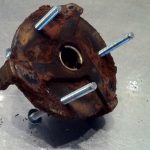
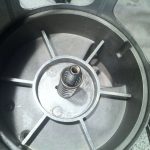
I then used a socket with a ratchet to keep the the lower burrcarrier from spinning while i removed the screws that held the burr in place. Obviously there were even more grounds. I left the lower burrcarrier in place because i really wanted to get the paint off as soon as possible.
-
- Unbolting the burr
-
- More old grounds
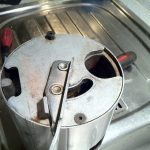
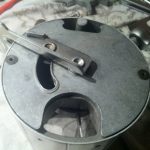
But first i needed to remove the doser. The doser is held on by 4 bolts. Once the upper two bolts are out you can easily remove the plastic screen. It was quite scratched up initially but a little polishing made it look quite good again (which i unfortunately do not have pictures off). At the bottom of the doser there are 2 more bolts that hold the doser onto the grinder.
-
- Two bolts on top (that also keep the screen in)
-
- Slide the screen out (carefully)
-
- The two bolts at the bottom of the doser.
Once the doser came off i took it apart to get all the old stale grounds out, clean it, check for hidden damage and re-grease everything that needs greasing. The first thing to be removed is the top set of vanes. I removed the top screw and then the big black adjustment nut. After that the vanes are freed and can be taken straight off. On the bottom of the vanes there are two small screws holding the entire thing together. I removed those to be able to clean the parts one by one. I then took of the spring that sits between the two sets of vanes, dirty is an understatement again.
To remove the bottom vanes i had to take the handle (or “clacker”) off along with the complete bottom of the doser. Luckily it’s quite easy as there were only 2 Allen-head bolts to take out. To remove the little gear inside i pressed the small pin into the gear first and then loosened the big black bolt running through the whole moving assembly. The gear itself is to be greased, the downside however is that grease traps loose particles like coffeegrounds. Once i cleaned the whole shebang i put screwed it back together as to not forget how it was supposed to fit together again.
-
- Retaining bolt and adjustment “nut”
-
- Top vanes coming off
-
- 2 small screws to take the top vanes apart
-
- Top vanes apart

-
- More stale grounds
-
- 2 Allen bolts hold the “clacker” and bottom on
-
- The gear that the “clacker” moves, pin pressed in
-
- Keeping things together in the correct order
-
- Cleaned gear
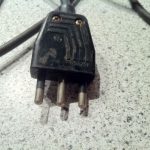
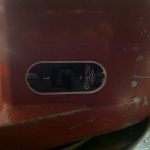
Next up cable and switch removal. Apparently Italy uses a different type of plug than what i’m used to so this one had to go. The cable itself was probably the original that came with the machine since it had gotten quite stiff and the insulation quite hard, i opted to switch it out completely for a new cable later on. The Switch was easier to deal with, two small bolts and the tag / plate and switch came off. I tied the switch to the motor inside the grinder body with a tie-wrap since i wouldn’t be painting the inside of the grinder anyway.
-
- Italian plug?
-
- Big plate of cast iron, a cable in the wrong place and old feet
-
- 2 small bolts to remove the switch
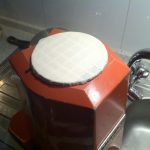
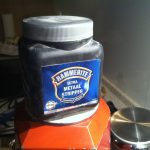
I masked the top of the grinder completely to make sure no paintstripper would get into it. It’s a dangerous and poisonous chemical substance that i’d rather not have end up in my espresso’s. Hammerite Ultra Paintstripper is my favorite paintstripper, unlike most it doesn’t have to be sprayed on but must be brushed on which makes it much easier to apply it to just the grinder instead of the entire garage. The stripper should be applied in a 2 – 3mm thick layer and left to do its job for about 6 – 8 hours depending on the condition and type of paint. The paint on the Mazzer must’ve been quite bad already as it started to come off after 4 hours already, i waited another hour and then gently(!) brushed the stripper and paint off with a wire brush. Somehow it looks quite interesting in bare aluminum.
-
- Top masked shut
-
- My trusted jar of paintstripper
-
- Applied generously
-
- Paint coming off after about 5 hours
-
- Paint and paintstripper removed with a wirebrush
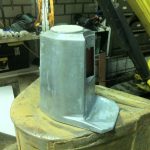
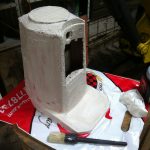
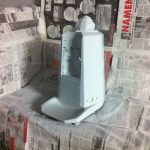
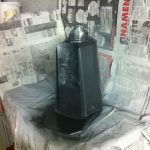
Once the old paint was off i cleaned it up with some white spirit to make sure there weren’t any solvents or bits of grime left on the body of the grinder. The body itself however was made out of cast aluminum, which in this case means that it was less than perfect in terms of smoothness. Generally in cast materials there are pits and grooves, this one is no different. To fill in all the grooves i used a layer of primer which was to be sanded once it cured. In total there are 5 layers of primer on it that each had been sanded to a smooth surface. Once i was satisfied with the primer layers i put on 4 layers of color. Nothing too fancy but probably a color that most Mazzers will never see, dark gray metallic. To top it all off i put on 3 layers of clearcoat on it get a nice deep shine.
-
- 5 Layers of primer
-
- And 4 layers of color plus 3 layers of clearcoat
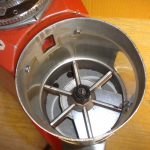
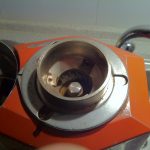
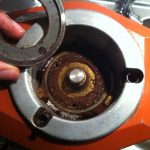
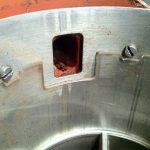
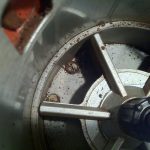
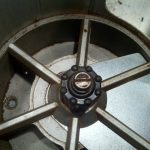
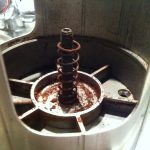
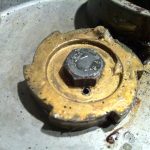
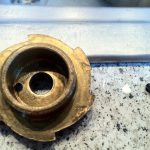
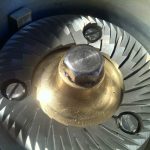
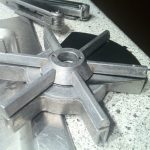
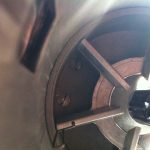
On the body had completely cured i took off all the maskingtape and started cleaning the grinding chamber. To get to the bottom of the chamber i had to remove the lower burrcarrier which is held on by one nut and friction. The nut came off easy but to get the burrcarrier off i used 3 stainless steel M4 sized bolts (regular grade steel bolts are too soft for this) which where thread through the mounting holes of the lower burr. Once the bolts are in deep enough you’ll hit the bottom of the chamber and you can force the carrier off by gently tightening the bolts, one by one and never more than one full turn before moving to the next bolt. Obviously there were plenty of old stale grounds under the carrier, but not that a good cleaning won’t get rid of. The carrier had a lot of caked on old grounds on it too. I even thought it had some clever design on the bottom but in the end that appeared to be nothing more than old grounds.
-
- Use 3 stainless bolts to remove the lower burrcarrier
-
- More grounds “yay”…
-
- And gone
-
- YIKES!
-
- At first i thought there was a clever design on the bottom of the burrcarrier
-
- But apparently that design was just old caked on grounds
-
- Looks much better clean

Putting it back together
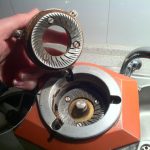
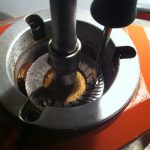
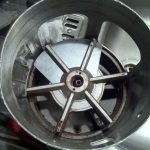
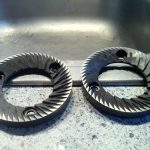
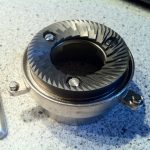
With the grindingchamber cleaned i reinstalled the lower burrcarrier and started cleaning the burrs. The burrs can be cleaned with warm water and some dishwashing soap, just make sure to dry them off really well because water will trap grounds and that will eventually clog up the machine. When i modded my Nemox Lux grinder i used stainless hardware exclusively. The reason for using only stainless is very simple, it doesn’t rust. And rust doesn’t mix with coffee. After cleaning and drying the burrs i reinstalled both and put the top carrier back in its place as well. On top of the top carrier comes the grindsetting ring, the threading is reversed and very fine and delicate. The easiest and safest way to reassemble it is by pressing the top carrier down with one hand and screwing the ring in with the other.
-
- Cleaning the burrs
-
- Lower burr installed with new stainless bolts
-
- Upper burr and carrier
-
- Put together with new stainless bolts as well
-
- Upper burrcarrier in place

-
- And secured with the grindsetting ring
Moving on to reassembling the doser. Every part was vigorously cleaned. The gear was quite greasy when i disassembled the doser, unnecessarily so. I put the shim on the lower vanes and into the doser. Then the brass gear slider over the long bolt which is then screwed into lower set of vanes. After carefully tightening the bolt and lower vanes i installed the little steel pin to prevent the bolt from undoing itself. I then applied a fair bit of food-safe silicone based grease to all moving parts and reinstalled the bottom plate and lever. The upper vanes actually consist of 2 set of vanes and a coverplate, which are assembled with 2 small bolts. The larger spring is then placed over the bolt in the middle of the doser. The upper vanes can now be installed by simply sliding it over the bolt and holding it down with one hand while installing the large plastic nut (dose adjuster). Beware of the coverplate though, it has a little bit of metal protruding that slides neatly into wall of the doser. Once that is all done i installed the little bolt in the top of the bolt so the adjustment nut can’t be backed off too far.
-
- Cleaned the gear
-
- Put the shim on the lower vanes
-
- Lower vanes and gear assembled, bolt secured

-
- View from inside the doser with lower vanes installed
-
- Lower part of the doser reinstalled
-
- Upper vanes
-
- Upper vanes installed and roughly adjusted
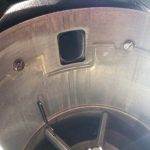
Now that the doser has been put together all that was left was bolting it the main body of the Mazzer. Originally there was a quite worn and sticky gasket around the exit of the grindingchamber. I chose to not source a (probably) overpriced original gasket and resorted to a foam that compressed easily enough and didn’t really retain any greases. The only thing that keeps this gasket in place is friction, no grease, no oil and certainly no glue. First i cut a piece that would fit in between the two bolt holes and then an opening in the middle to let grounds pass through (clever me). Securing the doser to the main body is rather simple, first put the doser with the gasket against the body and install the two bolts through the bottom of the grinder into the main body but do not tighten them yet. By this time i realised i hadn’t installed the plastic screen yet so that had to slide in first because the top two screws make it impossible to do so afterwards. Next make sure the gasket is where it is supposed to be and install and tighten the top two bolts. Once those two bolts are in and tight, you can tighten up the bottom two bolts.
-
- Cut a piece of foam to size
-
- Create an opening

-
- Put the bolts in but don’t tighten them yet
-
- Slide in the plastic screen

-
- Install upper bolts and tighten all 4 bolts
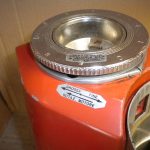
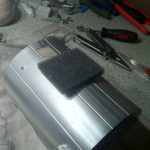
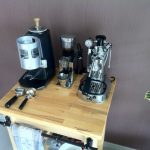
Basically that was it. My Mazzer Super Jolly is clean, has fresh coat of paint and has been checked top to bottom. As you can see there are a few things “missing”, most prominently the beanhopper. My Mazzer was sold to me without a hopper and initially i thought about getting the big, standard hopper or a smaller hopper meant for another model. I did however start using the grinder and i could only grind enough beans for 1 or 2 shots at a time and eventually i began to prefer grinding just what i needed, when i needed it. Why? Quite simple, beans in “open air” are only really fresh for short time, ground beans however become stale even faster so grinding for 3 days in advance is actually wasteful and you’ll end up with very poor tasting espresso eventually. Plus i get to keep that pretty machine clean. It also didn’t come with a lid for the doser and the rubber feet it sat on where quite worn as well.
-
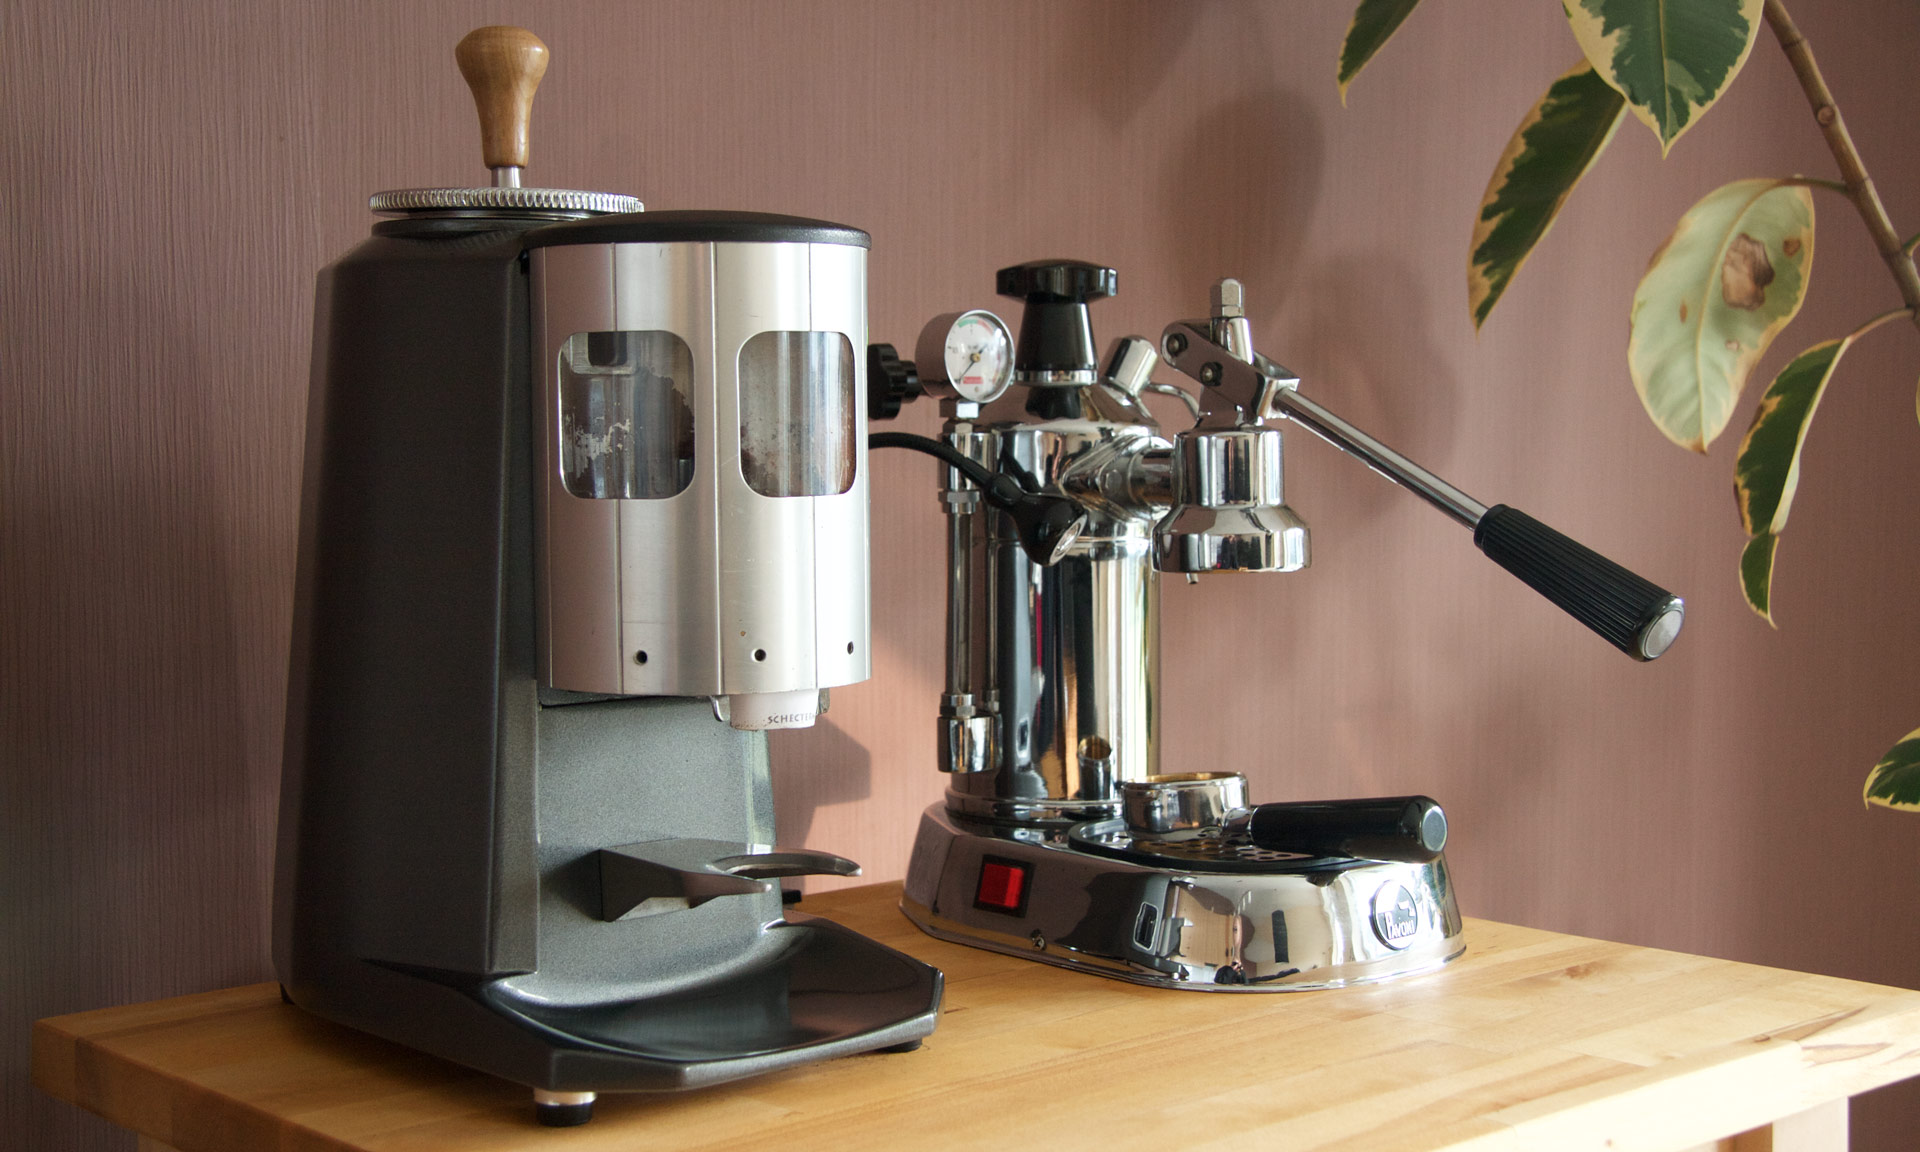
- My Mazzer, Nemox Lux and La Pavoni Professional
-
- New and old rubber feet
-
- Mazzer with new shoes and a hat

Upcoming mods
Having already put in a lot of time just to get the Mazzer working and looking good again, I couldn’t resist trying to improve it as well. While doing my research on these grinders, I also stumbled across a number of mods. In an upcoming post I will cover two mods, one widespread and one probably new to most Mazzer owners.
Conclusion
I’ve had the Mazzer for a few months now and i can honestly say it’s a vast improvement over the Nemox Lux. They are however quite different machines, the electric motor alone of the Mazzer is as big as the entire body of the Nemox Lux. It’s also a lot more silent, creates a very consistent and indeed fluffy grounds. So far static hasn’t been a problem either.
-
- Restored Mazzer and La Pavoni Professional

Thanks for sharing this story!
I’m currently waiting for my own abused Mazzer hulk to arrive from an eBay seller, and I’m hoping my resoration goes as smoothly as yours!
I am surprised that you were able to re-use the burrs. From what I’ve gathered, most Mazzer owners put in new ones as a matter of course on any used grinder, even one that’s “ready to roll” and not in need of restoration.
Nice work, and great write up!
Hey, good luck with restoring your Mazzer. I’m sure it’ll be a great grinder that’ll last you a lifetime and i would be interested in reading your write-up on your process of restoring it.
As for the burrs i can only say that they were sharp enough to still catch the skin on my fingertops. The burrs on my Astoria however are a whole different story, they probably wouldn’t even cut a strawberry anymore. There’s a bunch of different manufacturers making quality burrs though so once i catch my burrs getting dull i’ll most likely be doing a write-up on that process as well.
Hope to see a story on your restoration soon though 😉
Congrats on the restoration work! I’m looking for a SJ myself and will probably have to go over this too. The hopper is for looks only for us home baristas, but mazzer offers the standard 1.2 kilo one, a medium one and a really small one in Europe as replacements.
Thanks, i love how it turned out every day. Sometimes a Hopper would’ve been useful, but that’s only when i get to make more than 1 shot at a time (i.e. when we have people over). In terms of looks it takes some getting used to but honestly i really wouldn’t want that standard enormous hopper on it. I have one for the Astoria that i’m (still) restoring and i’ve tried it on my Mazzer as well but it just looks waaaaay too big next to my La Pavoni and the Poccino.
WOW, thank you soooo much. I have my own abused Mazzer and with your incredible step by step with PHOTOS!!!!!!! …. I can do this!!!!! I wasn’t even going to go as far as you did… but now… I want it to look like yours!!. Thanks!
Always happy to hear that 🙂 please feel free to ask any and all questions you may have!
Take care,
Sebastiaan
Thanks…. just started this afternoon… I’m not a mechanical person at all…. truely truely hoping I don’t murder my Mazzer… will keep you posted.. thanks
That Mazzer will put up one heck of a fight before it’ll let you murder it 😉 Don’t worry they are pretty solid machines and there’s not a whole lot to destroy. Best of luck =)
oh my GOD!!!!!!! just taking the paint off is a WHOLE thing unto itself…. you made this look so easy….!! but there is no going back now!!!! : – )
Getting the paint off isn’t all that hard but you’ll need a good paintstripper and leave it on for a couple of hours. After that it’ll come off with a wirebrush mostly.
well it must of been not too good…. 4 applications and I still have little bits.. my question is can I sand off the last little bits, and will it be an issue if there are little bits that I paint over??? I am in the States, and Home Depot sold me a can of paint with primer as one thing. Thanks so much for you help and hanging in my with me.
Depending on which kind of paintstripper you’re using you might have to let it “soak” for a few hours before attempting to remove it. I’ve on occasion had to apply a coat, remove what would come off and then apply another coat to areas that didn’t come off. If it’s just a few patches you can of course sand them down. You want to get it all off to have a smooth surface, every little speck that you don’t remove will show eventually in the finish. Before you put any new primer on wipe the entire thing down with some white spirit and a tack-free cloth.
I used a separate primer in a few layers which i sanded smooth for that extra nice finish.
me again…. I have a timer switch on my grinder, can I replace it for a on/off dial?
Oooh, that’s a good question. The Astoria (basically a Mazzer too) has a different switch from my Mazzer as well, haven’t really looked into replacing it. I’ll take a look at the actual switch tomorrow to see if there’s a chance that’s even possible.
Just checked but the Astoria’s switch is not a timer, i’m sorry. The Astoria has a switch that has an OFF / ON (but off) and Grind position. Once it is switched to “Grind” it will grind until a switch in the Doser tells it the Doser is full and then switches back to ON (but off) automatically. In my opinion a useless feature for Mazzers used at home since no home user needs that much grounds in a day, or even a week.
But i digress, the magic of that switch all happens in the switch itself and i think that i could probably switch (pun unintended ;)) it out for a regular Mazzer OFF/ON switch. The same goes for your timer switch, all the magic happens inside that switch (or rather the big block hanging off the back of it) and you can replace it with a similar switch as my Astoria has, OFF / ON (but off) / Grind. They are rather pricey replacements though and unless you really want that (5 minute i believe) timer gone, which i can fully understand, i wouldn’t bother with it. If you could measure the distance between the two bolt/screw holes for the switch/timer on yours i could tell you if that’s the same as on my Mazzers. If so, you could probably switch in a cheaper OFF/ON switch into it as well.
Sebastiaan, what would I do without you???….
Haha, i love helping people out. Be sure to send some pictures this way once you’re done 😉
Hi Sebastian,
Could you send me a picture of the wiring? I have one similar to yours and am not sure which wires go where. Can you post a pic or email me one? I am looking to see where the power cord hooks up and the doser as well.
Thanks!
Mazzer has a few different configurations, depending on which market the machine was manufactured for (domestic, commercial, etc). Then there are Mazzers that are as barebones as they come (like mine) or fully loaded with timers, doser-full-switches, counters and who knows what else. The Astoria i have, has a doser-switch and i think this might be the closest to the grinder you’re dealing with. I’ve put all the wiring related photo’s i have of the Astoria in a DropBox folder, let me know if there’s anything in there that helps you or if you need any additional help.
https://www.dropbox.com/sh/ae4bk52w1007vkx/JMimG9ZH6Q
Thanks so much!
Hi Sebastiaan!
Great post! I found it in the middle of restoring my Super Jolly. I must say I love these machines. They´re impressive! I´m just finishing with cleaning and thinking about one thing. Did You use some grease also on screw-thread on grind setting ring? Because when disassembling mine I found some there. Thanks so much for Your reply. Bye. Michal
I didn’t use any grease there. Grease will trap anything that comes into contact with it, including coffee grounds (that stuff gets everywhere…). Eventually the buildup will make it impossible to rotate the ring at all. Leave it dry, mine has been just fine ever since 🙂
Hello Sebastiaan, how did You get out the little steel pin at the bottom of the doser. I´m strugling with it. Thank You!
That little steel pin can be a pain indeed. I used a pin that was just a tad smaller in diameter than the steel pin itself (so it wouldn’t get lodged in the gear instead) and then cautiously hammered it out. It’s not easy but it shouldn’t be, you don’t want that thing falling out every other week 😉
Thanks! Finally got it! And now I can enjoy my cup of coffee. Grinder works great!
Saw this post earlier before, and am looking at it again – fascinating. Great work Sebastiaan.
Hi!
Interesting read, thanks for sharing. I have a pavoni professional too! And Im getting a mazzer super jolie this weekend. Unlike yours, mine was barely used, but still interesting to see how it’s put together.
Just one question; how do you add the beans without the hopper? Do you just pour them in the hole? How do you dose your beans? Whats the thing on top? Is it your tamper?
I am also planning to just grind per shot as I dont drink 50 shots a day.
I’m very interested in your response.
Kindest regards,
Carlos
Hi Carlos,
you will love the Professional with a Super Jolly, they are a great combo. I personally don’t use a hopper as you noticed, i don’t grind enough beans to actually need one. I have a custombuilt sleeve that fits snugly inside the opening where you’d normally fit the hopper that itself has an opening that is just big enough for the tamper that i use with my La Pavoni. I dose my beans using a small scale with a 0.01 gram accuracy, then pour them into the sleeve, put the tamper on top and grind. After that i make sure that i have the amount of ground coffee that i was going for in my portafilter and then put it in either the La Pavoni or the Poccino.
For more info take a look at my post “To hopper or not to hopper” 😉
Hey Sebastiaan!
Love all you’ve written here. I have an old Astoria and I think the motor has thrown a bearing and I of course there’s nobody in this area who repair them.:( So I would like to attempt it myself. How difficult of a task do you think this would be? I have another old grinder I was thinking I could steel a motor from. Also, any idea where I’d find instructions or designs on the insides of this thing?
Hi Kathy, the bearings on these machines are a press fit job. That means you need a pretty hefty set of tools (a press and bearing pullers) to get them to budge. Your best bet would be to look for a shop that rebuilds electric motors and have them pull and replace the bearings. The motor itself (the rotating part) usually never really wears down unless it severely overheats and the windings overheat.
Hello, could you tell me what brands of primer, paint and clear coat you used? This restoration looks so nice, it has given me a lot of hope for a very abused, scratched up Rio SJ I just purchased. Fortunately mine works very well and has new burs, but it is an eyesore. I want to make sure I purchase the right sort of paint for a project like this, and whatever you used looks appropriately shiny, like it belongs on metal kitchen gadgets (rather than paint I would use on my walls).
Hi Millie, I used automotive rattle cans. 3M has those, as well as Motip. I’m sure 3M is fairly common all over the world but Motip might not be. However, any automotive rattle can will do. Just make sure to do multiple light passes to prevent runs.
Hi Sebastiaan,
Could you elaborate on how you rewired it from 380v to 240v? Thank you!
I’ve never had the pleasure of converting a 380v version down to 220v. That said, it is possible but would have to do additional research myself.
Hmm but it seems from your photo that the motor is operated at 380v ? I saw a few listings of the grinder online but I’m a bit afraid that it won’t work at all.
It’s a general switch, used on both the 220v and 380v versions. It’s somewhat confusing I agree. However, when you look at the plug of the machine, you can see it only has 3 prongs, phase, neutral and ground. In the case of a 380v version that plug would’ve had two more prongs to carry the other two phase connections.
Just purchased an ancient Mazzer Super Jolly labeled Astoria this afternoon for $50.00. Looks like the windings for the motor are fried. Two of the four leads from the switch leading to the windings were totally burned up and loose. The remaining two were still connected but in horrible condition. There is no nametag on the grinder. Any ideas of trying to find replacement windings? Overall the grinder is in good shape and the doser is remarkably clean. Thanks.
Are you sure the actual windings are fried? On a younger model frayed or falling apart isolation would be a clear indication of significant grinder abuse. However, on older models that still have the original wiring it’s very well possible that it’s merely deterioration of the isolation on the wiring. Regardless, they’ll have to be replaced before you ever think about turning it on! As for the windings, see if you can see any sort of bubbles or charred spots, or anything else that indicates burning or excessive heat. If possible, send me a photo (either link it in a comment or send it by mail).
The windings themselves are not separately available, they come pre-wound on a new rotor. That rotor is usually not an easy thing to replace since the bearings that it runs in are hot mounted, meaning that the entire casing is heated up to a point where it expands slightly, then the rotor and bearings are installed and when the casing cools down the bearings are held in very securely. It is possible to remove them by reversing this process but it’s anything but easy. Also, the rotor is generally a special order item that isn’t cheap (~$150).
Hi Sebatiaan,
Great post! Thanks for sharing the step-by-step process. I am restoring an old Super Jolly and it helped me a lot during the cleaning part. I am now ready to strip the old paint and refinish it. I really liked the effect you achieved on yours. Could you share the products you used (primer, paint and clear coat – brand/model)? Do you think a clean metal primer would be enough or should I use a self etching one first? Which product did you use to achieve the high gloss effect? or was it a result of wet sanding/buffing it at the end?
Thanks a lot!
Hi Gilbert, I’ve used Motip rattle cans for my Super Jolly. I’m not entirely sure Motip is available the world over though. However, I used a primer / filler combo (also from Motip) that supposedly is a little thicker. Thicker spray filler is great since it’ll fill all sorts of pits, grooves, seams, dents and imperfections. After that it’s merely a matter of sanding it back down to a smooth finish.
I used 5 layers of primer / filler, then 4 layers of color and then 3 layers of clear coat. I didn’t wet sand in between any of the layers, I just sprayed the next layer when the previous coat is still a very little bit tacky.
Hi, great restoration. I’ve just picked up the same grinder. What did you do with the labels on the side and larger MM on the rear. Did you paint the stripper over these and they just lifted up?
I removed the labels before applying the stripper. The labels will most likely not come off by simply applying paint stripper (not the one I used anyways). You can try removing them by applying heat or sticker remover, the latter however will probably destroy the sticker in the process though. I personally didn’t put the stickers back on.
As for the rear badge, it comes off. Sometimes they are glued on, sometimes they have two metal pins inserted into the body of the grinder. Don’t apply any sort of heat to the plastic badges though, they don’t hold up too well.
Hi,
I know you did this a long time ago but I love it without the hopper.My question is what are you using as the hopper lid? is this something you can buy or if you made it please can you let me know how?
I hope is all well with your Mazzer and it is still going strong. I am now on ebay looking to buy one and got outbid last night with someone using some ebay software that no matter what I bid his pc would just add on another £2.00 to my bid! He won!
Regards
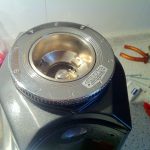
In this post there’s actually nothing in place of the hopper, just my 49mm tamper for my La Pavoni. If you’re grinding single shots that’ll be fine if you can deal with maybe one or two beans popping back out every now and then. If you have a tamper with a larger that’ll probably prevent beans from popping back out again. That said, I made an aluminum sleeve as you can see in this post: “To hopper or not to hopper“.
Hi Sebastiaan, awesome thread, i just got mine Super Jolly and i’m having difficulty finding any information on the polishing of the small opening between grinding chamber and doser. Did you do anything with that to prevent coffee fines from collecting?
I lightly sand chutes on any Mazzer with 400 grit until I see no deep scratches anymore, that’s about it. Going much further doesn’t make much sense as it still builds up. I keep a small brush on hand and use that to wipe the rest out of the chute.